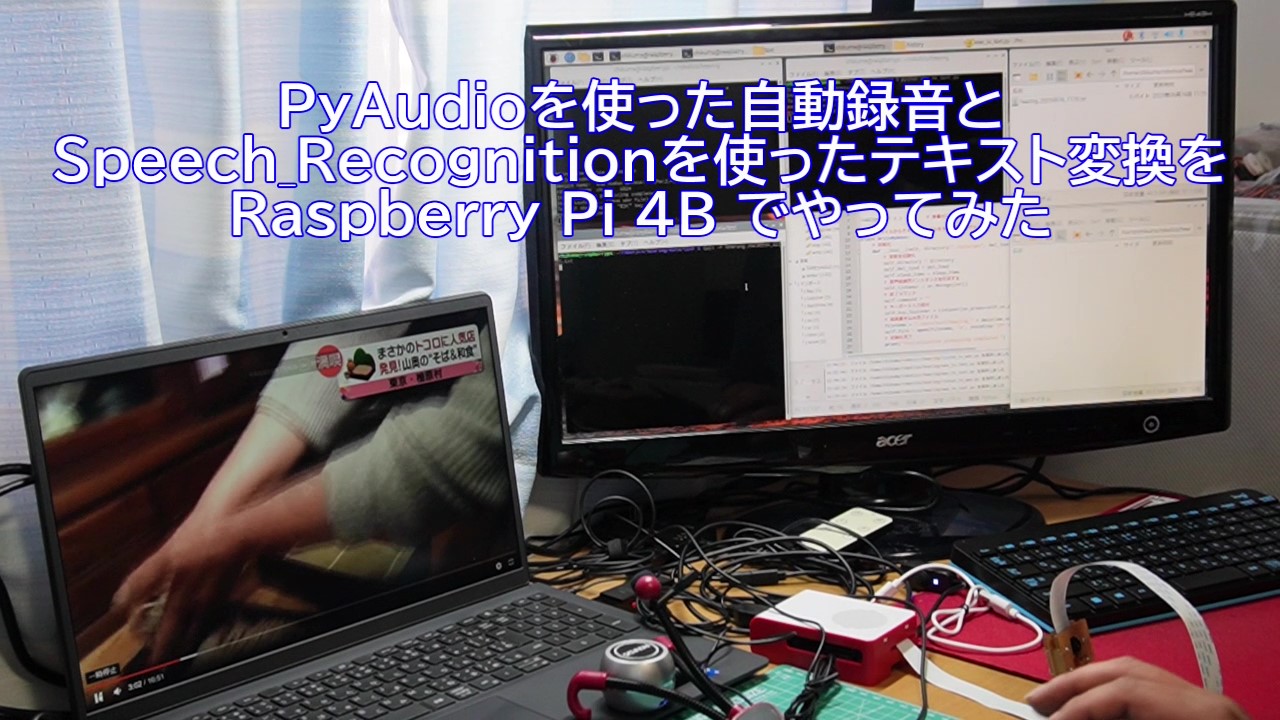
前回に引き続き、ロボットに耳を備えるための実験です。ある程度、本気でプログラムを作った結果、耳として使えるレベルになったのではないかと思います。
再度、音声認識を試してみる
先日、speech_recognition を使った音声認識をRaspberryPiで行ってみましたが、上手くいかなかったため、録音と音声認識を非同期に行うように改良して、試してみました。結果は、100点とはいきませんでしたが、前回よりも格段に良かったので、記事に掲載しました。

ハードウェア構成は、前回と同じで、Raspberry Pi 4B とUSBマイク、おまけでスピーカも載せておきます。使用したハードウェアは、別のモノでも動かすのには支障はないと思います。
録音プログラム
それでは、録音を行うプログラムをpyAudioとwaveライブラリを使って作っていきます。
- マイクデバイスを探して入力待ちにする
- マイクから入力されたデータの音量が閾値を超えたら録音を開始する
- マイクから入力されたデータの音量が0.8秒以上連続で閾値以下になったら録音を終了する
- 別スレッドで録音データをwavファイルとして保存する
import pyaudio, wave
import numpy as np
import os, time, threading
from datetime import datetime
from pynput.keyboard import Key, Listener

# 定数設定
CHUNK_SIZE = 1024		# チャンクサイズ
CHANNEL_IN = 1			# インプットチャンネル(1:モノラル、2:ステレオ)
THRESHOLD = 0.08		# 音量のしきい値
SILENCE_SECONDS = 0.8		# 無音状態で何秒経過したら録音をやめるか
RECORD_SECONDS = 15		# 最大何秒まで録音するか

# 聞いた内容をWAVファイルで保存するプログラム
class RecordByListen:
	def __init__(self,channel_in=CHANNEL_IN,rate=0,chunk_size=CHUNK_SIZE):
		# PyAudioを作成する
		self.pa = pyaudio.PyAudio()
		# デバッグメッセージが勝手に出力される為、空行を出力して送る
		print("The above is a pyaudio debug message, so please ignore is.")
		for i in range(20):
			print()
		# デバイス番号を初期化
		self.device_no = 0
		# マイクを探す
		for i in range(self.pa.get_device_count()):
			painfo = self.pa.get_device_info_by_index(i)
			if painfo['maxInputChannels'] > 0:
				self.device_no = i
				self.device_info = painfo
				# チャンネル:モノラルなら1 ステレオなら2(初期値は1)
				self.channels = channel_in
				# レート(周波数)
				# 引数のレートが0ならデバイス情報のデフォルトサンプルレートを使う
				if rate == 0:
					self.rate = int(painfo['defaultSampleRate'])
				else:
					self.rate = rate
				# チャンク(1回あたりの読み込みデータサイズ)
				self.chunk = chunk_size
				break
		# マイクが見つからなかった場合は、終了する。
		if self.device_no == 0:
			print("Nof found microphone device!")
			sys.exit(0)
		# 最初に見つかったマイクを使用する
		print("Microphone device infomation")
		print("device index: ", self.device_no)
		print("device name: ", self.device_info["name"])
		print("rate: ", self.rate, " chunk: ", self.chunk)
		# ストリームを開く
		self.stream = self.pa.open(
					format = pyaudio.paInt16,
					channels = self.channels,
					rate = self.rate,
					input = True,
					input_device_index = self.device_no,
					frames_per_buffer = self.chunk,
					stream_callback = self.callback
				)
		# 音声入力中かどうかのフラグ
		self.is_recording = False
		# 音声データの2次元配列(無音時には取り込まない)
		self.data_array = [[]]
		self.recording_no = 0
		# 音声入力中の無音回数カウント
		self.silences_count = 0
		# 録音回数
		self.recording_count = 0
		# 最大録音カウント数
		self.recording_max = int(self.rate / self.chunk * RECORD_SECONDS)
		# 無音期間の終了カウント数
		self.silences_max = int(self.rate / self.chunk * SILENCE_SECONDS)
		# 終了コマンド
		self.command = ""
		# キーボード入力受付
		self.key_listener = Listener(on_press=self.on_press,on_release=self.on_release)
		# 初期化完了
		print("Initialization processing completed.")
		self.start_time = time.time()

	# コールバック関数(サンプリング間隔で呼ばれ続ける)
	def callback(self, in_data, frame_count, time_info, status):
		try:
			# 音声認識に投げるかどうか?
			go_recognize = False
			# 音量を数値化する
			x = np.frombuffer(in_data, dtype="int16") / 37268.0
			# レコーディング回数をカウントアップ
			if self.is_recording:
				self.recording_count += 1

			# しきい値以上の場合は、バッファに追加する
			if x.max() > THRESHOLD:
				if not self.is_recording:
					print("Recording start: {:.2f}".format(time.time() - self.start_time))
				self.silences_count = 0
				self.is_recording = True
				self.data_array[self.recording_no].append(in_data)
			else:
				if (self.is_recording):
					self.silences_count += 1
					self.data_array[self.recording_no].append(in_data)
					# 最大録音時間を超えるか、最大無音時間を超えると保存する
					if ((self.recording_count > self.recording_max)
						or (self.silences_count > self.silences_max)):
						print("Recording stop: {:.2f}".format(time.time() - self.start_time))
						go_recognize = True

			# 終了ステータスを設定
			if self.command == "quit":
				ret_status = pyaudio.paComplete
			else:
				ret_status = pyaudio.paContinue

			# 音声の録音を行う場合
			if go_recognize:
				# 録音番号を進めて、から配列を追加する
				rec_no = self.recording_no
				self.recording_no += 1
				self.data_array.append([])
				# 録音中の各変数の初期化をしておく
				self.recording_count = 0
				self.is_recording = False
				self.silences_count = 0
				# 別スレッドでファイルを保存する
				save_thread = threading.Thread(target=self.save, args=(rec_no,))
				save_thread.start()
		except Exception as e:
			print(e)
		finally:
			return None, ret_status

	# wavファイルの書き出し処理
	def save(self, rec_no):
		try:
			start_time = time.time()				# perf-measure
			# データを結合する
			all_data = b''.join(self.data_array[rec_no])
			time1 = time.time() - start_time			# perf-measure
			start_time = time.time()				# perf-measure
			# 最大音量をチェック
			x = np.frombuffer(all_data, dtype="int16") / 37268.0
			voice_time = float(len(all_data) / self.rate)
			# しきい値を超えている場合のみ処理する
			if (x.max() > THRESHOLD):
				tmp_dir = "./data/wav/.tmp"
				# テンポラリディレクトリを作成する
				if not os.path.isdir(tmp_dir):
					os.mkdir(tmp_dir)
				# ファイル名を時間で作成する。
				filename = "hearing_" + datetime.now().strftime("%Y%m%d_%H%M%S_%f") + ".wav"
				# テンポラリフォルダにファイルを書き込む
				tmp_file = tmp_dir + "/" + filename
				reg_file = './data/wav/' + filename
				wavfile = wave.open(tmp_file, 'wb')
				wavfile.setnchannels(self.channels)
				wavfile.setsampwidth(self.pa.get_sample_size(pyaudio.paInt16))
				wavfile.setframerate(self.rate)
				wavfile.writeframes(all_data)
				wavfile.close()
				# リネームして正規のフォルダへ移動する
				os.rename(tmp_file, reg_file)
				time2 = time.time() - start_time		# perf-measure
				# DEBUG PRINT BEGIN
				print("Save: ", reg_file)
				print("Recording time: {:.2f}[s]".format(voice_time),
						" preproc: {:.2f}[s]".format(time1),
						" mainproc: {:.2f}[s]".format(time2),
						" size: {:.2f}[KB]".format(float(len(all_data) / 1024)))
				# DEBUG PRINT END
			else:
				print("Sorry, I could't hear your voice.")
			# 配列をクリアする
			self.data_array[rec_no] = []
		except Exception as e:
			print(e)

	# メインループ
	def main(self):
		# 聞き取り開始
		print("Start Listning...(Save wav file)")
		self.start()
		print("To exit the program, \"ESC\" key press.")

		#メインループ
		while self.stream.is_active():
			time.sleep(0.1)

		# 終了
		print("\nEnd Listning")
		self.stop()

	# リスニング開始
	def start(self):
		self.stream.start_stream()
		self.key_listener.start()

	# 後処理
	def stop(self):
		self.stream.stop_stream()
		self.stream.close()
		self.pa.terminate()
		self.key_listener.stop()
		self.key_listener = None

	# キーボード制御
	def on_press(self,key):
		print('{0} pressed'.format(key))

	def on_release(self,key):
		if key == Key.esc:
			self.command = "quit"
		return True

# メインプログラム
# 標準的なレートは 44100 だが、一番 48000 が聞き取り確率が高い
if __name__ == "__main__":
	listner = RecordByListen(rate=48000)
	listner.main()
音声テキスト変換プログラム
保存された音声ファイルを順番に読み込んでspeech_recognitionを使ってテキストに変換するプログラムを作っていきます。
- ディレクトリを監視しておきwavファイルが作成されたら読み込む
- wavファイルをspeech_recognitionのrecognize_googleでテキストに変換する
- テキストをファイルに書き込む
- wavファイルを.historyディレクトリに移動する
import speech_recognition as sr
import os, time, wave
import numpy as np
from datetime import datetime
from pynput.keyboard import Key, Listener

THRESHOLD = 0.1			# 音量のしきい値

# 音声ファイルからテキストファイルを生成するプログラム
class WriteByWave:
	# 初期化
	def __init__(self, directory="./data/wav", del_load=True, sleep_time=1.0):
		# 変数を初期化
		self.directory = directory
		self.del_load = del_load
		self.sleep_time = sleep_time
		# 音声認識用インスタンスを作成する
		self.listener = sr.Recognizer()
		# 終了コマンド
		self.command = ""
		# キーボード入力受付
		self.key_listener = Listener(on_press=self.on_press,on_release=self.on_release)
		# 結果書き込み用ファイル
		filename = "./data/text/hearing_" + datetime.now().strftime("%Y%m%d_%H%M") + ".txt"
		self.file = open(filename, 'a', encoding='UTF-8')
		# 初期化完了
		print("Initialization processing completed.")

	# テキストに変換した内容を書き出す
	def write(self, text):
		# 標準出力とファイルに書き出す
		print(text)
		self.file.write(text + "\n")
		self.file.flush

	# キーボード制御
	def on_press(self,key):
		print('{0} pressed'.format(key))

	def on_release(self,key):
		if key == Key.esc:
			self.command = "quit"
		return True

	# リスニング開始
	def start(self):
		self.key_listener.start()

	# 後処理
	def stop(self):
		self.file.close()
		self.key_listener.stop()
		self.key_listener = None

	# 変換処理
	def recognize(self):
			# 音声認識済のファイルを移動するディレクトリ
			backup_dir = "./data/wav/.history"
			# テンポラリディレクトリを作成する
			if not os.path.isdir(backup_dir):
				os.mkdir(backup_dir)
			# ディレクトリ内のファイルを取得する
			for filename in os.listdir(self.directory):
				# wavファイル名
				wav_filename = os.path.join(self.directory, filename)
				# 実ファイルのみ処理の対象とする
				if (not os.path.isfile(wav_filename)):
					continue
				# WAVファイルを読み込んでテキストに変換していく
				# sr.AudioFile で wavファイルを読み込んでもうまくいかない為
				start_time = time.time()						# perf-measure
				# wavファイルとして開く
				wav_file = wave.open(wav_filename, 'rb')
				frames = wav_file.getnframes()
				rate = wav_file.getframerate()
				width = wav_file.getsampwidth()
				wav_data = wav_file.readframes(frames)
				wav_file.close()
				time1 = time.time() - start_time					# perf-measure
				start_time = time.time()						# perf-measure
				try:
					x = np.frombuffer(wav_data, dtype="int16") / 37268.0
					# DEBUG PRINT BEGIN
					print("read file:", wav_filename, "max volume:{:.4f}".format(x.max()))
					# DEBUG PRINT END
					if (x.max() > THRESHOLD):
						# 一つずつテキストに変換する
						voice = sr.AudioData(wav_data, rate, width)
						# 音声をテキストに変換
						voice_text = self.listener.recognize_google(voice, language="ja-JP")
						if len(voice_text) > 0:
							self.write(voice_text)
						else:
							print("Sorry, I could't recognize this wav file.")
					time2 = time.time() - start_time				# perf-measure
					# DEBUG PRINT BEGIN
					print("recognize: ",
							" preprocess: {:.2f}[s]".format(time1),
							" mainprocess: {:.2f}[s]".format(time2),
							" text: {}[char]".format(len(voice_text)))
					# DEBUG PRINT END
				except sr.UnknownValueError:
					print("UnknownValueError.")
					pass
				except sr.RequestError:
					print("RequestError.")
					pass
				except Exception as e:
					print(e)
				finally:
					if self.del_load:
						if os.path.isfile(wav_filename):
							os.rename(wav_filename, backup_dir + "/" + filename)

	# メインループ
	def main(self):
		# 処理開始
		print("Start converting audio files to text.")
		self.start()
		print("To exit the program, \"ESC\" key press.")

		#メインループ
		while True:
			self.recognize()
			if self.command == "quit":
				break
			time.sleep(self.sleep_time)

		# 終了
		print("\nEnd converting")
		self.stop()

# メインプログラム
if __name__ == "__main__":
	writer = WriteByWave()
	writer.main()
コメントが多く無駄に長く感じますが、私自身がpythonの勉強中なのでご容赦ください。
自動音声テキスト変換システムの動作実験
2つのターミナルで録音プログラム(listen_to_wav.py)と音声テキスト変換プログラム(wav_to_text.py)を実行して、マイクから音声を入力します。実際にニュース動画を使って実験をしてみます。
テキストは、かなり減ってしまっていますが、誤変換や録音が飛んでいる訳ではないので、ある程度、納得できる結果です。
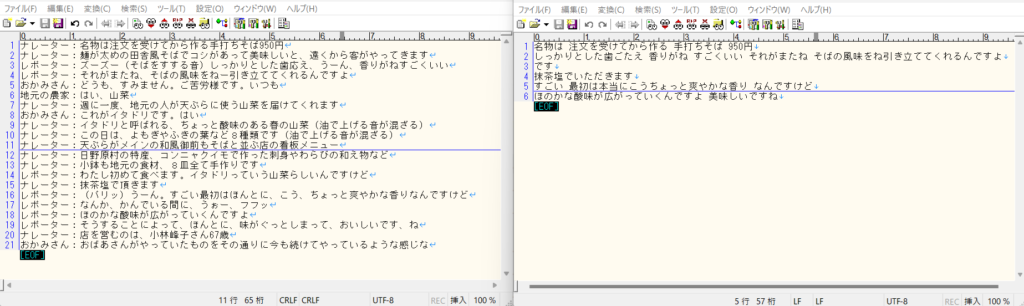
おそらく、speech_recognition では、認識していない単語が出てくると「UnknownValueError」が発生して、その文章全体がエラーになっているのだと思います。その為、難しい言い回しや、普通使われないような単語が出てくると変換が出来ていないようです。ただ、レコーダーの方は、ほぼ完ぺきです。無音時は保存されず、音が出ているときは、遅延なく保存が出来ています。
雑音除去や話者識別なども入れて、もっと音声を明瞭にすることが出来れば、音声からテキストへ変換する際にエラーが発生する確率を減らすことが出来るかもしれません。また、それは次の機会ということにします。
Juliusも使ってみる
和製の音声認識システムであるJuliusも使ってみましたが、辞書やモデルが充実していないことが理由だとは思いますが、デタラメなテキストになってしまい、深掘りするのは断念しました。一応、参考情報として最新版のJuliusのインストール方法を載せておきます。
mkdir ~/julius-speech
cd ~/julius-speech
curl -sSfL https://github.com/julius-speech/julius/archive/refs/tags/v4.6.tar.gz -o julius-4.6.tar.gz
tar -zxvf julius-4.6.tar.gz
cd julius-4.6/
Raspberry Pi 4B (64bit) で実行するためには、最新版のconfig.guessとconfig.subが必要になりました。
wget https://git.savannah.gnu.org/cgit/config.git/plain/config.guess
cp config.guess support/
cp config.guess jcontrol/
wget https://git.savannah.gnu.org/cgit/config.git/plain/config.sub
cp config.sub support/
cp config.sub jcontrol/
必要な追加ソフトをインストールします。
sudo apt-get install libjcode-perl libsoudio-dev libsoundtouch-dev libsndfile-devMakefileの作成、コンパイル、インストールを行います。
./configure --with-mictype=alsa
make
sudo make install
ディクテーションキットのダウンロードをします。(ディクテーションキットとは、初期のモデル情報や実行時に必要になるconf情報などが入ったパッケージです)
cd ..
mkdir julius-kit
cd julius-kit
wget https://github.com/julius-speech/dictation-kit/archive/refs/tags/dictation-kit-v4.3.1.tar.gz
tar zxvf dictation-kit-v4.3.1.tar.gz
上のコマンドだとディレクトリが変な名前になったような気がします。強制的にディレクトリ名を修正しました。(mv -rf dictation-kit-dictation-kit-v4.3.1 dictation-kit-v4.3.1)
続いてマイクの設定を行います。(以下、#で始まる行はコメントなので飛ばしてください。)
# マイクの設定を確認します。
cat /proc/asound/modules
0 snd_bcm2835
1 snd_bcm2835
2 snd_usb_audio

# alsa-base.conf を編集します。
sudo nano /etc/modprobe.d/alsa-base.conf
# マイクを一番上に持っていきます。
options snd slots=snd_usb_audio,snd_bcm2835,snd_bcm2835
options snd_usb_audio index=0
options snd_bcm2835 index=1
options snd_bcm2835 index=2

# 起動のたびにサウンドデバイスの設定を読み込むように設定する
sudo nano ~/.profile
# 以下のコードを書き込む
export ALSADEV="plughw:0:0"

# 追加で必要となるソフトウェアをインストールします。
sudo apt-get install alsa-utils sox libsox-fmt-all
# 設定ファイルをメンテナンスします。
sudo nano /etc/modules
# 以下を追記
snd-pcm

# 再起動します
sudo reboot now
デモを動かしてみます。
cd ~/julius-speech/dict/dictation-kit-v4.3.1
julius -C main.jconf -C am-gmm.jconf -demo
マイクで入力した音声をテキストで表示します。もしwavファイルをテキスト変換する場合は、以下のように入力します。
julius -C main.jconf -C am-gmm.jconf -48 -input rawfileファイル名の入力時にwavファイル名を入力すれば音声からテキストの変換処理が動き結果が画面に表示されます。
以上

コメント